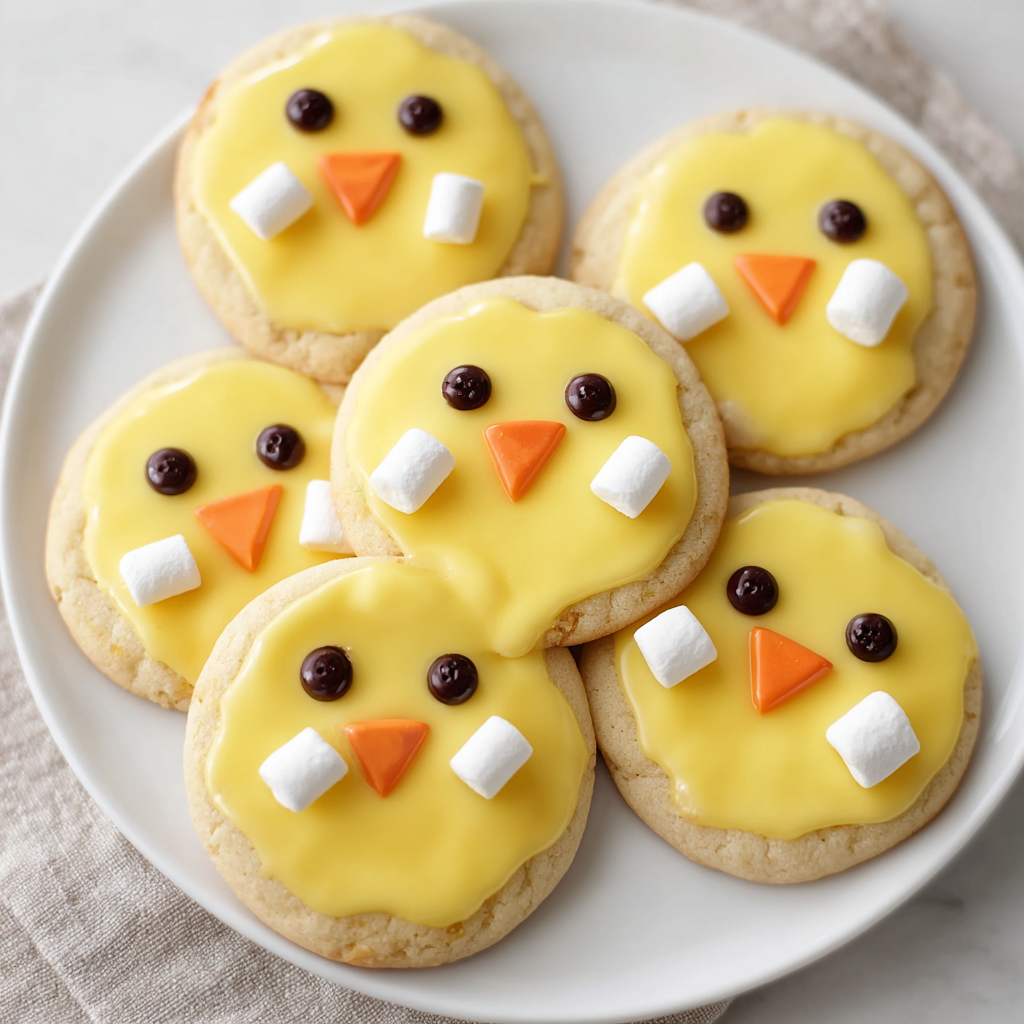
Chick Egg Cookies are a beginner-friendly holiday bake with a buttery crumb, simple cut-out shaping, and cheerful yellow icing that makes them ideal for Easter dessert tables, spring parties, and homemade gift tins.

These cookies are the kind of festive treat that look playful and special without asking you to master complicated decorating skills. You get a soft, easy-to-handle dough, a sweet finish, and a design that feels instantly seasonal.
What makes them work so well is the balance between a plain butter cookie base and a bright, smooth icing layer. The cookie itself stays simple and familiar, which lets the yellow topping and tiny facial details do all the visual work.
They are also a smart choice when you want something homemade that can be made with basic pantry ingredients. A round cutter, a small bit of tinted dough, and a quick icing finish are enough to turn ordinary cookies into a charming spring centerpiece.
Chick Egg Cookies Ingredients
Unsalted butter gives the dough its rich flavor and tender texture. Let it soften before mixing so it blends evenly with the sugar and flour.
Caster sugar sweetens the cookies while helping create a finer, delicate crumb. Its light texture makes the dough easier to bring together smoothly.
Plain flour forms the structure of the cookies. It keeps the shapes neat enough for cutting and baking without turning dense.
Vanilla extract rounds out the flavor with a warm bakery-style note that pairs beautifully with the buttery base.
Milk is only used as needed, which is important here. A small splash helps the dough hold together, but too much can make the cookies spread more than you want.
Orange food coloring is worked into a small portion of dough for the beaks. This is a fun detail that gives the cookies their chick look before the icing even goes on.
Powdered sugar creates the smooth icing layer. Sifting it first helps avoid lumps and keeps the finish cleaner.
Water or lemon juice loosens the icing to a spreadable consistency. Lemon juice adds a slightly brighter flavor, while water keeps the sweetness more neutral.
Yellow food coloring transforms the icing into the classic chick look. Start with a little and build the color gradually so you can control the shade.
Tiny marshmallows and small chocolate pieces add the final decorative details. They make the cookies feel playful and help each one look a little more handmade and unique.

Step-by-Step Chick Egg Cookies
STEP 1: Heat your oven and line a baking tray so the cookies are ready to go as soon as the dough is shaped. Starting with a prepared tray keeps the dough from sitting too long at room temperature, which helps the cut-outs hold their shape better.
STEP 2: Rub the softened butter, sugar, and flour together until the mixture looks crumbly, then mix in the vanilla. Add just enough milk for the dough to come together into a soft mass. It should feel pliable and smooth, not sticky or wet.
STEP 3: Roll the dough out on a lightly floured surface and cut it into even rounds. Keep the thickness fairly consistent so the cookies bake at the same rate and the icing later sits nicely across the tops.
STEP 4: Tint a small piece of dough orange and cut tiny triangles for the beaks. Press one onto the center of each round before baking. This gives the design a built-in feature and makes decorating feel much easier once the cookies have cooled.
STEP 5: Bake until the cookies are set and the edges are only lightly golden. You want them baked through but still pale enough to keep that soft, festive look. Transfer them to a rack and let them cool completely before you even think about icing.
STEP 6: Stir together the powdered sugar and your chosen liquid until the icing is smooth and spreadable, then tint it yellow. Spoon or pipe it over the cooled cookies, leaving the beak visible. Once the surface begins to set, add the marshmallow and chocolate details so each cookie gets its little chick face.
Can I make the dough ahead of time?
Yes. You can make the dough in advance and chill it before rolling, which is especially helpful if your kitchen is warm. Let it sit briefly at room temperature before shaping so it softens just enough to roll without cracking.
How do I keep the icing from sliding off the cookies?
The biggest key is fully cooled cookies. If there is any warmth left, the icing will loosen and spread too much. It also helps to add the liquid gradually so the icing stays thick enough to coat the top instead of dripping away.
Can I use white icing instead of yellow?
Absolutely. White icing gives the cookies a softer, different look and works well if you want to turn the same dough into a bunny-themed or general spring cookie platter. The base cookie stays the same, so the decorating style is easy to switch.
Do I need a special cookie cutter for this design?
No. A simple drinking glass or round cutter is enough for the main shape, and the beaks can be cut by hand from the orange dough. That makes this a very approachable baking project even if you do not own decorating tools.
Helpful Tips
- Chill the dough for a short time if it feels too soft after mixing. Firmer dough is easier to roll and helps the circles stay neater in the oven.
- Keep the beak pieces small and centered so they bake evenly and still show clearly once the icing is added.
- Let the icing set fully before stacking or packaging the cookies, especially if you are making them for gifts or a holiday dessert tray.
Perfect Pairings
A glass of cold milk is the most classic match. It balances the sweetness and makes these cookies feel especially family-friendly for spring gatherings.
For a softer afternoon spread, serve them with tea or a light coffee. The buttery cookie and sweet icing pair nicely with warm drinks without feeling too heavy.
They also look lovely on a mixed Easter platter with fresh berries or other simple homemade treats. That gives the bright yellow finish even more visual impact on the table.
Keeping Leftovers Fresh
Store the finished cookies in an airtight container at room temperature for up to 4 days. If the icing is fully set, you can layer them carefully with parchment between the rows to protect the decoration.
The unbaked dough can be refrigerated for up to 2 days before rolling and baking. You can also freeze the baked, undecorated cookies for up to 2 months, then thaw and decorate when needed. Once iced, it is best to keep them in a single layer until the tops are completely firm so the chick faces stay neat and intact.

Chick Egg Cookies
Ingredients
For the Cookies:
- 200 g unsalted butter softened at room temperature (about 70°F)
- 1 teaspoon vanilla extract
- 300 g plain flour
- 1 to 2 tablespoons milk as needed
- orange food coloring
- 100 g caster sugar
For the Decoration:
- 2 cups powdered sugar sifted
- yellow food coloring
- 2 to 3 tablespoons water or lemon juice
- a small piece of chocolate for the eyes
- tiny marshmallows
Instructions
- Preheat the oven to 180°C (350°F).
- Place the flour, sugar, and softened butter into a mixing bowl. Rub the mixture together with your fingertips until the texture resembles rough crumbs.
- Add the vanilla extract and combine. If the mixture appears too dry to hold together, add a small amount of milk and mix again. Add a little more only if required, taking care not to over-moisten the dough, as this may cause the cookies to spread during baking.
- Transfer the dough to a lightly floured work surface and roll it out evenly. Using a glass or round cutter, cut out circular cookie shapes.
- Set aside a small portion of the dough and work in a little orange food coloring. Roll this colored dough out and cut small triangle shapes to create the chick beaks.
- Arrange the round cookie pieces on a baking tray. Position one orange triangle in the center of each round to form the beak.
- Bake for 10 to 15 minutes, or until the edges begin to turn lightly golden. If preferred, the orange triangles may be removed slightly earlier so they do not darken too much.
- Move the baked cookies to a wire rack and leave them to cool fully. The cookies must be completely cool before icing so the decoration does not melt.
- To make the icing, stir the sifted powdered sugar with water or lemon juice in a small bowl until a smooth consistency is achieved. The icing should be spreadable but not overly thin. Tint it with yellow food coloring for the chick design.
- Spoon or pipe the yellow icing over each cooled cookie, spreading it evenly across the surface.
- Allow the icing to set before adding the finishing details. Use tiny marshmallows and small pieces of chocolate to decorate the cookies as desired.


